Trying Metal3 on a development environment
Ready to start taking steps towards your first experience with metal3? Follow these commands to get started!
1. Environment Setup
info: “Naming” For the v1alpha3 release, the Cluster API provider for Metal3 was renamed from Cluster API provider BareMetal (CAPBM) to Cluster API provider Metal3 (CAPM3). Hence, from v1alpha3 onwards it is Cluster API provider Metal3.
1.1. Prerequisites
- System with CentOS 9 Stream or Ubuntu 22.04
- A hosting operating system with QEMU/KVM is required, as this development environment uses VMs to emulate bare metal hosts
- Run as a user with passwordless sudo access
- Minimum resource requirements for the host machine: 4C CPUs, 16 GB RAM memory
Note: The
metal3-dev-envscripts modify parts of the host system, including networking and installed packages. It is strongly recommended to run them in a virtual machine or a dedicated environment to avoid unintended changes to your primary system.
For execution with VMs
- Setup passwordless sudo access
sudo visudo
- Include this line at the end of the sudoers file (replace ‘username’ with the actual account name for passwordless sudo access)
username ALL=(ALL) NOPASSWD: ALL
- Save and exit
- Manually enable nested virtualization if you don’t have it enabled in your system
  # To enable nested virtualization
  # On CentOS Stream 9 (other distros may vary)
  # check the current setting
  $ sudo cat /sys/module/kvm_intel/parameters/nested
  N     # disabled

  $ sudo vi /etc/modprobe.d/kvm.conf
  # uncomment either of the line
  # for Intel CPU, select [kvm_intel], for AMD CPU, select [kvm_amd]

  options kvm_intel nested=1
  #options kvm_amd nested=1

  # unload
  $ sudo modprobe -r kvm_intel

  # reload
  $ sudo modprobe kvm_intel

  $ sudo cat /sys/module/kvm_intel/parameters/nested
  Y     # just enabled
1.2. Setup
info: “Information” If you need detailed information regarding the process of creating a Metal3 emulated environment using metal3-dev-env, it is worth taking a look at the blog post “A detailed walkthrough of the Metal3 development environment”.
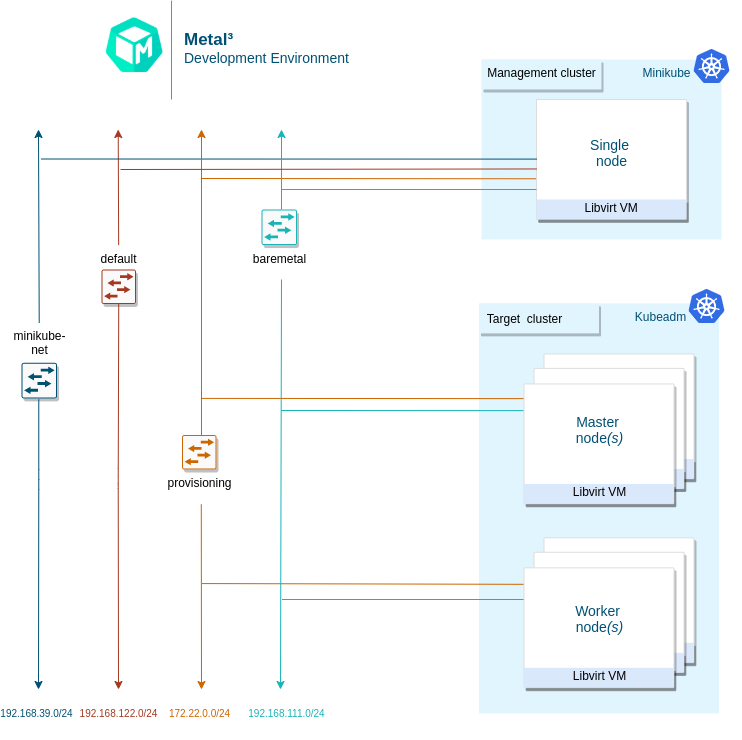
This is a high-level architecture of the Metal3-dev-env. Note that for an Ubuntu-based setup, either Kind or Minikube can be used to instantiate an ephemeral cluster, while for a CentOS-based setup, only Minikube is currently supported. The ephemeral cluster creation tool can be manipulated with the EPHEMERAL_CLUSTER environment variable.
The short version is: clone metal³-dev-env and run
make
The Makefile runs a series of scripts, described here:
-
01_prepare_host.sh- Installs all needed packages. -
02_configure_host.sh- Creates a set of VMs that will be managed as if they were bare metal hosts. It also downloads some images needed for Ironic. -
03_launch_mgmt_cluster.sh- Launches a management cluster usingminikubeorkindand runs thebaremetal-operatoron that cluster. -
04_verify.sh- Runs a set of tests that verify that the deployment was completed successfully.
When the environment setup is completed, you should be able to see the
BareMetalHost (bmh) objects in the Ready state.
1.3. Tear Down
To tear down the environment, run
make clean
info: “Note” When redeploying metal³-dev-env with a different release version of CAPM3, you must set the
FORCE_REPO_UPDATEvariable inconfig_${user}.shto true. warning “Warning” If you see this error during the installation:error: failed to connect to the hypervisor \ error: Failed to connect socket to '/var/run/libvirt/libvirt-sock': \ Permission deniedYou may need to log out then log in again, and run
make cleanandmakeagain.
1.4. Using Custom Image
Whether you want to run target cluster Nodes with your own image, you can
override the three following variables: IMAGE_NAME, IMAGE_LOCATION,
IMAGE_USERNAME. If the requested image with the name IMAGE_NAME does not
exist in the IRONIC_IMAGE_DIR (/opt/metal3-dev-env/ironic/html/images) folder,
then it will be automatically downloaded from the IMAGE_LOCATION value
configured.
1.5. Setting environment variables
info: “Environment variables” More information about the specific environment variables used to set up metal3-dev-env can be found in the metal3-dev-env documentation.
To set environment variables persistently, export them from the configuration file used by metal3-dev-env scripts:
 cp config_example.sh config_$(whoami).sh
 vim config_$(whoami).sh
2. Working with the Development Environment
2.1. BareMetalHosts
This environment creates a set of VMs to manage as if they were bare metal hosts.
There are two different host OSs that the metal3-dev-env setup process is tested on.
- Host VM/Server on CentOS, while the target can be Ubuntu or CentOS, Cirros, or FCOS.
- Host VM/Server on Ubuntu, while the target can be Ubuntu or CentOS, Cirros, or FCOS.
The way the k8s cluster is running in the above two scenarios is different. For
CentOS minikube cluster is used as the source cluster, for Ubuntu, a kind
cluster is being created. As such, when the host (where the make command was
issued) OS is CentOS, there should be three libvirt VMs and one of them should
be a minikube VM.
In case the host OS is Ubuntu, the k8s source cluster is created by using
kind, so in this case the minikube VM won’t be present.
To configure what tool should be used for creating source k8s cluster the
EPHEMERAL_CLUSTER environment variable is responsible. The EPHEMERAL_CLUSTER
is configured to build minikube cluster by default on a CentOS host and
kind cluster on a Ubuntu host.
VMs can be listed using virsh cli tool.
In case the EPHEMERAL_CLUSTER environment variable is set to kind the list of
running virtual machines will look like this:
$ sudo virsh list
 Id    Name       State
--------------------------
 1     node_0     running
 2     node_1     running
In case the EPHEMERAL_CLUSTER environment variable is set to minikube the
list of running virtual machines will look like this:
$ sudo virsh list
 Id   Name       State
--------------------------
 1    minikube   running
 2    node_0     running
 3    node_1     running
Each of the VMs (aside from the minikube management cluster VM) is
represented by BareMetalHost objects in our management cluster. The yaml
definition file used to create these host objects is in ${WORKING_DIR}/bmhosts_crs.yaml.
$ kubectl get baremetalhosts -n metal3 -o wide
NAME     STATUS   STATE       CONSUMER   BMC                                                                                         HARDWARE_PROFILE   ONLINE   ERROR   AGE
node-0   OK       available              ipmi://192.168.111.1:6230                                                                   unknown            true             58m
node-1   OK       available              redfish+http://192.168.111.1:8000/redfish/v1/Systems/492fcbab-4a79-40d7-8fea-a7835a05ef4a   unknown            true             58m
You can also look at the details of a host, including the hardware information gathered by doing pre-deployment introspection.
$ kubectl get baremetalhost -n metal3 -o yaml node-0


apiVersion: metal3.io/v1alpha1
kind: BareMetalHost
metadata:
  annotations:
    kubectl.kubernetes.io/last-applied-configuration: |
      {"apiVersion":"metal3.io/v1alpha1","kind":"BareMetalHost","metadata":{"annotations":{},"name":"node-0","namespace":"metal3"},"spec":{"bmc":{"address":"ipmi://192.168.111.1:6230","credentialsName":"node-0-bmc-secret"},"bootMACAddress":"00:ee:d0:b8:47:7d","bootMode":"legacy","online":true}}
  creationTimestamp: "2021-07-12T11:04:10Z"
  finalizers:
  - baremetalhost.metal3.io
  generation: 1
  name: node-0
  namespace: metal3
  resourceVersion: "3243"
  uid: 3bd8b945-a3e8-43b9-b899-2f869680d28c
spec:
  automatedCleaningMode: metadata
  bmc:
    address: ipmi://192.168.111.1:6230
    credentialsName: node-0-bmc-secret
  bootMACAddress: 00:ee:d0:b8:47:7d
  bootMode: legacy
  online: true
status:
  errorCount: 0
  errorMessage: ""
  goodCredentials:
    credentials:
      name: node-0-bmc-secret
      namespace: metal3
    credentialsVersion: "1789"
  hardware:
    cpu:
      arch: x86_64
      clockMegahertz: 2694
      count: 2
      flags:
       - aes
       - apic
       # There are many more flags but they are not listed in this example.
      model: Intel Xeon E3-12xx v2 (Ivy Bridge)
    firmware:
      bios:
        date: 04/01/2014
        vendor: SeaBIOS
        version: 1.13.0-1ubuntu1.1
    hostname: node-0
    nics:
    - ip: 172.22.0.20
      mac: 00:ee:d0:b8:47:7d
      model: 0x1af4 0x0001
      name: enp1s0
      pxe: true
    - ip: fe80::1863:f385:feab:381c%enp1s0
      mac: 00:ee:d0:b8:47:7d
      model: 0x1af4 0x0001
      name: enp1s0
      pxe: true
    - ip: 192.168.111.20
      mac: 00:ee:d0:b8:47:7f
      model: 0x1af4 0x0001
      name: enp2s0
    - ip: fe80::521c:6a5b:f79:9a75%enp2s0
      mac: 00:ee:d0:b8:47:7f
      model: 0x1af4 0x0001
      name: enp2s0
    ramMebibytes: 4096
    storage:
    - hctl: "0:0:0:0"
      model: QEMU HARDDISK
      name: /dev/sda
      rotational: true
      serialNumber: drive-scsi0-0-0-0
      sizeBytes: 53687091200
      type: HDD
      vendor: QEMU
    systemVendor:
      manufacturer: QEMU
      productName: Standard PC (Q35 + ICH9, 2009)
  hardwareProfile: unknown
  lastUpdated: "2021-07-12T11:08:53Z"
  operationHistory:
    deprovision:
      end: null
      start: null
    inspect:
      end: "2021-07-12T11:08:23Z"
      start: "2021-07-12T11:04:55Z"
    provision:
      end: null
      start: null
    register:
      end: "2021-07-12T11:04:55Z"
      start: "2021-07-12T11:04:44Z"
  operationalStatus: OK
  poweredOn: true
  provisioning:
    ID: 8effe29b-62fe-4fb6-9327-a3663550e99d
    bootMode: legacy
    image:
      url: ""
    rootDeviceHints:
      deviceName: /dev/sda
    state: ready
  triedCredentials:
    credentials:
      name: node-0-bmc-secret
      namespace: metal3
    credentialsVersion: "1789"
2.2. Provision Cluster and Machines
This section describes how to trigger the provisioning of a cluster and hosts via
Machine objects as part of the Cluster API integration. This uses Cluster API
v1beta1 and
assumes that metal3-dev-env is deployed with the environment variable
CAPM3_VERSION set to v1beta1. This is the default behavior. The v1beta1
deployment can be done with Ubuntu 22.04 or Centos 9 Stream target host images.
Please make sure to meet resource requirements for
successful deployment:
See support version for more on CAPI compatibility
The following scripts can be used to provision a cluster, controlplane node and worker node.
./tests/scripts/provision/cluster.sh
./tests/scripts/provision/controlplane.sh
./tests/scripts/provision/worker.sh
At this point, the Machine actuator will respond and try to claim a
BareMetalHost for this Metal3Machine. You can check the logs of the
actuator.
First, check the names of the pods running in the baremetal-operator-system
namespace and the output should be something similar to this:
$ kubectl -n baremetal-operator-system get pods
NAME                                                    READY   STATUS    RESTARTS   AGE
baremetal-operator-controller-manager-5fd4fb6c8-c9prs   2/2     Running   0          71m
In order to get the logs of the actuator the logs of the baremetal-operator-controller-manager instance have to be queried with the following command:
$ kubectl logs -n baremetal-operator-system pod/baremetal-operator-controller-manager-5fd4fb6c8-c9prs -c manager
...
{"level":"info","ts":1642594214.3598707,"logger":"controllers.BareMetalHost","msg":"done","baremetalhost":"metal3/node-1", "provisioningState":"provisioning","requeue":true,"after":10}
...
Keep in mind that the suffix hashes e.g. 5fd4fb6c8-c9prs are automatically
generated and change in case of a different deployment.
If you look at the yaml representation of the Metal3Machine object, you will
see a new annotation that identifies which BareMetalHost was chosen to
satisfy this Metal3Machine request.
First list the Metal3Machine objects present in the metal3 namespace:
$ kubectl get metal3machines -n metal3
NAME                       PROVIDERID                                      READY   CLUSTER   PHASE
test1-controlplane-jjd9l   metal3://d4848820-55fd-410a-b902-5b2122dd206c   true    test1
test1-workers-bx4wp        metal3://ee337588-be96-4d5b-95b9-b7375969debd   true    test1
Based on the name of the Metal3Machine objects you can check the yaml
representation of the object and see from its annotation which BareMetalHost
was chosen.
$ kubectl get metal3machine test1-workers-bx4wp -n metal3 -o yaml
...
  annotations:
    metal3.io/BareMetalHost: metal3/node-1
...
You can also see in the list of BareMetalHosts that one of the hosts is now
provisioned and associated with a Metal3Machines by looking at the CONSUMER
output column of the following command:
$ kubectl get baremetalhosts -n metal3
NAME     STATE         CONSUMER                   ONLINE   ERROR   AGE
node-0   provisioned   test1-controlplane-jjd9l   true             122m
node-1   provisioned   test1-workers-bx4wp        true             122m
It is also possible to check which Metal3Machine serves as the infrastructure
for the ClusterAPI Machine objects.
First list the Machine objects:
$ kubectl get machine -n metal3
NAME                     CLUSTER   NODENAME                 PROVIDERID                                      PHASE     AGE   VERSION
test1-6d8cc5965f-wvzms   test1     test1-6d8cc5965f-wvzms   metal3://7f51f14b-7701-436a-85ba-7dbc7315b3cb   Running   53m   v1.22.3
test1-nphjx              test1     test1-nphjx              metal3://14fbcd25-4d09-4aca-9628-a789ba3e175c   Running   55m   v1.22.3
As a next step you can check what serves as the infrastructure backend for e.g.
test1-6d8cc5965f-wvzms Machine object:
$ kubectl get machine test1-6d8cc5965f-wvzms -n metal3 -o yaml
...
  infrastructureRef:
    apiVersion: infrastructure.cluster.x-k8s.io/v1beta1
    kind: Metal3Machine
    name: test1-workers-bx4wp
    namespace: metal3
    uid: 39362b32-ebb7-4117-9919-67510ceb177f
...
Based on the result of the query test1-6d8cc5965f-wvzms ClusterAPI Machine
object is backed by test1-workers-bx4wp Metal3Machine object.
You should be able to ssh into your host once provisioning is completed.
The default username for both CentOS & Ubuntu images is metal3.
For the IP address, you can either use the API endpoint IP of the target cluster
which is - 192.168.111.249 by default or use the predictable IP address of
the first master node - 192.168.111.100.
ssh metal3@192.168.111.249
2.3. Deprovision Cluster and Machines
Deprovisioning of the target cluster is done just by deleting Cluster and
Machine objects or by executing the de-provisioning scripts in reverse order
than provisioning:
./tests/scripts/deprovision/worker.sh
./tests/scripts/deprovision/controlplane.sh
./tests/scripts/deprovision/cluster.sh
Note that you can easily de-provision worker Nodes by decreasing the number of
replicas in the MachineDeployment object created when executing the
provision/worker.sh script:
kubectl scale machinedeployment test1 -n metal3 --replicas=0
warning “Warning” control-plane and cluster are very tied together. This means that you are not able to de-provision the control-plane of a cluster and then provision a new one within the same cluster. Therefore, in case you want to de-provision the control-plane you need to de-provision the cluster as well and provision both again.
Below, it is shown how the de-provisioning can be executed in a more manual way by just deleting the proper Custom Resources (CR).
The order of deletion is:
- Machine objects of the workers
- Metal3Machine objects of the workers
- Machine objects of the control plane
- Metal3Machine objects of the control plane
- The cluster object
An additional detail is that the Machine object test1-workers-bx4wp is
controlled by the test1 MachineDeployment the object thus in order to avoid
reprovisioning of the Machine object the MachineDeployment has to be
deleted instead of the Machine object in the case of test1-workers-bx4wp.
$ # By deleting the Machine or MachineDeployment object the related Metal3Machine object(s) should be deleted automatically.


$ kubectl delete machinedeployment test1 -n metal3
machinedeployment.cluster.x-k8s.io "test1" deleted


$ # The "machinedeployment.cluster.x-k8s.io "test1" deleted" output will be visible almost instantly but that doesn't mean that the related Machine
$ # object(s) has been deleted right away, after the deletion command is issued the Machine object(s) will enter a "Deleting" state and they could stay in that state for minutes
$ # before they are fully deleted.


$ kubectl delete machine test1-m77bn -n metal3
machine.cluster.x-k8s.io "test1-m77bn" deleted


$ # When a Machine object is deleted directly and not by deleting a
$ # MachineDeployment the "machine.cluster.x-k8s.io "test1-m77bn" deleted" will
$ # be only visible when the Machine and the related Metal3Machine object has
$ # been fully removed from the cluster. The deletion process could take a few
$ # minutes thus the command line will be unresponsive (blocked) for the time
$ # being.


$ kubectl delete cluster test1 -n metal3
cluster.cluster.x-k8s.io "test1" deleted
Once the deletion has finished, you can see that the BareMetalHosts are
offline and Cluster object is not present anymore
$ kubectl get baremetalhosts -n metal3
NAME     STATE       CONSUMER   ONLINE   ERROR   AGE
node-0   available              false            160m
node-1   available              false            160m


$ kubectl get cluster -n metal3
No resources found in metal3 namespace.
2.4. Running Custom Baremetal-Operator
The baremetal-operator comes up running in the cluster by default, using an
image built from the
metal3-io/baremetal-operator
repository. If you’d like to test changes to the baremetal-operator, you can
follow this process.
First, you must scale down the deployment of the baremetal-operator running
in the cluster.
kubectl scale deployment baremetal-operator-controller-manager -n baremetal-operator-system --replicas=0
To be able to run baremetal-operator locally, you need to install
operator-sdk. After that, you can run
the baremetal-operator including any custom changes.
cd ~/go/src/github.com/metal3-io/baremetal-operator
make run
2.5. Running Custom Cluster API Provider Metal3
There are two Cluster API-related managers running in the cluster. One includes a set of generic controllers, and the other includes a custom Machine controller for Metal3.
Tilt development environment
Tilt setup can deploy CAPM3 in a local kind cluster. Since
Tilt is applied in the metal3-dev-env deployment, you can make changes inside
the cluster-api-provider-metal3 folder and Tilt will deploy the changes
automatically.
If you deployed CAPM3 separately and want to make changes to it, then
follow CAPM3 instructions. This will save you from
having to build all of the images for CAPI, which can take a while. If the
scope of your development will span both CAPM3 and CAPI, then follow the
CAPI and CAPM3 instructions.
2.6. Accessing Ironic API
Sometimes you may want to look directly at Ironic to debug something. The metal3-dev-env repository contains clouds.yaml file with connection settings for Ironic.
Metal3-dev-env will install the unified OpenStack and standalone OpenStack Ironic command-line clients on the provisioning host as part of setting up the cluster.
Note that currently, you can use either a unified OpenStack client or an Ironic client. In this example, we are using an Ironic client to interact with the Ironic API.
Please make sure to export
CONTAINER_RUNTIME environment variable before you execute
commands.
Example:
[notstack@metal3 metal3-dev-env]$ export CONTAINER_RUNTIME=docker
[notstack@metal3 metal3-dev-env]$ baremetal node list
+--------------------------------------+---------------+--------------------------------------+-------------+--------------------+-------------+
| UUID                                 | Name          | Instance UUID                        | Power State | Provisioning State | Maintenance |
+--------------------------------------+---------------+--------------------------------------+-------------+--------------------+-------------+
| b423ee9c-66d8-48dd-bd6f-656b93140504 | metal3~node-1 | 7f51f14b-7701-436a-85ba-7dbc7315b3cb | power off   | available          | False       |
| 882533c5-2f14-49f6-aa44-517e1e404fd8 | metal3~node-0 | 14fbcd25-4d09-4aca-9628-a789ba3e175c | power off   | available          | False       |
+--------------------------------------+---------------+--------------------------------------+-------------+--------------------+-------------+
To view a particular node’s details, run the below command. The
last_error, maintenance_reason, and provisioning_state fields are
useful for troubleshooting to find out why a node did not deploy.
[notstack@metal3 metal3-dev-env]$ baremetal node show b423ee9c-66d8-48dd-bd6f-656b93140504
+------------------------+------------------------------------------------------------+
| Field                  | Value                                                      |
+------------------------+------------------------------------------------------------+
| allocation_uuid        | None                                                       |
| automated_clean        | True                                                       |
| bios_interface         | redfish                                                    |
| boot_interface         | ipxe                                                       |
| chassis_uuid           | None                                                       |
| clean_step             | {}                                                         |
| conductor              | 172.22.0.2                                                 |
| conductor_group        |                                                            |
| console_enabled        | False                                                      |
| console_interface      | no-console                                                 |
| created_at             | 2022-01-19T10:56:06+00:00                                  |
| deploy_interface       | direct                                                     |
| deploy_step            | {}                                                         |
| description            | None                                                       |
| driver                 | redfish                                                    |
| driver_info            | {u'deploy_kernel': u'http://172.22.0.2:6180/images/ironic-python-agent.kernel', u'deploy_ramdisk': u'http://172.22.0.2:6180/images/ironic-python-agent.initramfs', u'redfish_address': u'http://192.168.111.1:8000', u'redfish_password': u'******', u'redfish_system_id': u'/redfish/v1/Systems/492fcbab-4a79-40d7-8fea-a7835a05ef4a', u'redfish_username': u'admin', u'force_persistent_boot_device': u'Default'} |
| driver_internal_info   | {u'last_power_state_change': u'2022-01-19T13:04:01.981882', u'agent_version': u'8.3.1.dev2', u'agent_last_heartbeat': u'2022-01-19T13:03:51.874842', u'clean_steps': None, u'agent_erase_devices_iterations': 1, u'agent_erase_devices_zeroize': True, u'agent_continue_if_secure_erase_failed': False, u'agent_continue_if_ata_erase_failed': False, u'agent_enable_nvme_secure_erase': True, u'disk_erasure_concurrency': 1, u'agent_erase_skip_read_only': False, u'hardware_manager_version': {u'generic_hardware_manager': u'1.1'}, u'agent_cached_clean_steps_refreshed': u'2022-01-19 13:03:47.558697', u'deploy_steps': None, u'agent_cached_deploy_steps_refreshed': u'2022-01-19 12:09:34.731244'} |
| extra                  | {}                                                         |
| fault                  | None                                                       |
| inspect_interface      | agent                                                      |
| inspection_finished_at | None                                                       |
| inspection_started_at  | 2022-01-19T10:56:17+00:00                                  |
| instance_info          | {u'capabilities': {}, u'image_source': u'http://172.22.0.1/images/CENTOS_8_NODE_IMAGE_K8S_v1.22.3-raw.img', u'image_os_hash_algo': u'md5', u'image_os_hash_value': u'http://172.22.0.1/images/CENTOS_8_NODE_IMAGE_K8S_v1.22.3-raw.img.md5sum', u'image_checksum': u'http://172.22.0.1/images/CENTOS_8_NODE_IMAGE_K8S_v1.22.3-raw.img.md5sum', u'image_disk_format': u'raw'} |
| instance_uuid          | None                                                       |
| last_error             | None                                                       |
| lessee                 | None                                                       |
| maintenance            | False                                                      |
| maintenance_reason     | None                                                       |
| management_interface   | redfish                                                    |
| name                   | metal3~node-1                                              |
| network_data           | {}                                                         |
| network_interface      | noop                                                       |
| owner                  | None                                                       |
| power_interface        | redfish                                                    |
| power_state            | power off                                                  |
| properties             | {u'capabilities': u'cpu_vt:true,cpu_aes:true,cpu_hugepages:true,boot_mode:bios', u'vendor': u'Sushy Emulator', u'local_gb': u'50', u'cpus': u'2', u'cpu_arch': u'x86_64', u'memory_mb': u'4096', u'root_device': {u'name': u's== /dev/sda'}}                                                                                                                                                                                        |
| protected              | False                                                      |
| protected_reason       | None                                                       |
| provision_state        | available                                                  |
| provision_updated_at   | 2022-01-19T13:03:52+00:00                                  |
| raid_config            | {}                                                         |
| raid_interface         | no-raid                                                    |
| rescue_interface       | no-rescue                                                  |
| reservation            | None                                                       |
| resource_class         | None                                                       |
| retired                | False                                                      |
| retired_reason         | None                                                       |
| storage_interface      | noop                                                       |
| target_power_state     | None                                                       |
| target_provision_state | None                                                       |
| target_raid_config     | {}                                                         |
| traits                 | []                                                         |
| updated_at             | 2022-01-19T13:04:03+00:00                                  |
| uuid                   | b423ee9c-66d8-48dd-bd6f-656b93140504                       |
| vendor_interface       | redfish                                                    |
+-------------------------------------------------------------------------------------+